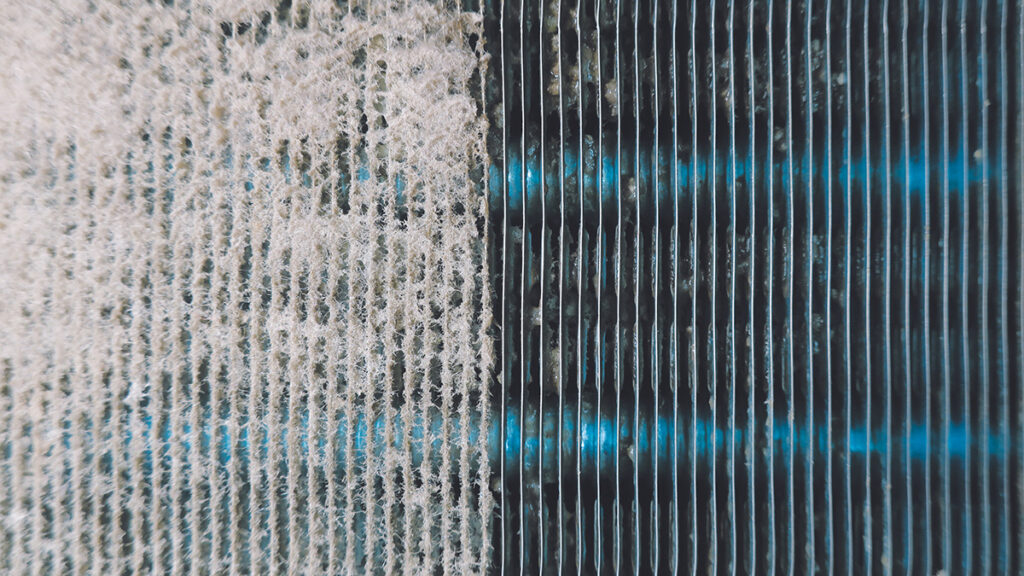
 The humidity hit 88 percent by 9 a.m. in Cutler Bay, and the condenser unit behind the house sounded like it was gargling gravel. The homeowner had already swapped the filter twice this month, but the supply vents still pushed air that smelled like a wet towel left in a gym bag. When the tech pulled the access panel on the evaporator coil, the fins were coated in a gray-brown mat that looked like felt — dust, pollen, and the sticky residue that forms when South Florida humidity turns dust into glue. That coil had been building that blanket for two cooling seasons, and no filter change was going to peel it off. The homeowner asked, "How would I have known it got this bad?" The answer: photos taken the same way, same time of year, same angle — so you can see the change before the system chokes.
Why photograph coils instead of just looking?
Your eyes adjust to gradual change. A coil that darkens by five percent each month looks the same every time you peek at it. A photo freezes the exact color and texture on that day. Three months later, you put the two images next to each other and the difference jumps out — fins that were silver are now dull gray, the spaces between fins show fuzz, and the drain pan has a slime line that wasn't there before. That comparison is what triggers action before the system runs longer cycles, spikes your electric bill, or freezes up on a 95-degree afternoon in Homestead.What equipment do you need?
A smartphone made in the last five years works fine. You need the built-in flash or a small LED flashlight that puts out at least 300 lumens. A tape measure or a piece of string cut to 18 inches helps you keep the same shooting distance. A notepad or the notes app on your phone records the date, which coil you shot (evaporator inside the air handler, condenser outside), and any odd smells or sounds. That's it. No special lenses, no tripod, no color card.How do you access the evaporator coil safely?
Turn the system off at the thermostat and the breaker. The evaporator lives inside the air handler — usually in a closet, garage, or attic. Remove the access panel screws (typically 1/4-inch hex or Phillips). Shine your light across the fins, not straight down. The coil sits in an A-frame or slab shape; you want to see the face of the fins, not the edge. If the panel is sealed with foil tape, cut it cleanly and reseal with fresh foil tape after. Never touch the fins with your fingers — they bend like wet cardboard and don't spring back.How do you access the condenser coil outside?
Kill power at the outdoor disconnect box (usually a gray box on the wall within sight of the unit). Remove the top grille or side panels — most residential units in Miami-Dade use 5/16-inch hex screws. The condenser coil wraps the inside of the cabinet like a radiator. You'll shoot through the fan opening or between the louvers. Watch for wasp nests in the corner brackets; they love the shade behind the coil in July. If you see activity, stop and call a pest pro first.What camera settings and angles work best?
Hold the phone 18 inches from the coil face, centered on a recognizable landmark — a bent fin, a manufacturer sticker, a corner of the frame. Use the main rear camera, not the wide-angle. Turn on flash. Tap the screen to focus on the fins, not the cabinet. Shoot straight on, not at a slant. Take three shots: full coil face, left half, right half. Repeat the exact same positions every session. Consistency beats resolution.How does lighting change what you see?
Flash straight on creates hot spots that hide texture. Angle the light 30 degrees off-center — hold the flashlight in your off hand, phone in the other — so the beam rakes across the fins. This casts tiny shadows that reveal fuzz, corrosion pits, and biofilm shine. For the condenser, shoot mid-morning or late afternoon when the sun isn't blasting the cabinet. Direct sun washes out the fin color. Cloudy days give the most even light if you can wait.What should you look for in the photos?
Compare fin color: clean aluminum is bright silver. Dust turns it matte gray. Biofilm — the sticky mix of bacteria, pollen, and skin cells — shows as a yellow-green sheen that catches light like oil on water. Corrosion looks like white powder or pitted dots, especially near the coast where salt air rides the breeze past Kendall and into Pinecrest. Debris thickness: if you can't see individual fin edges in the close-up, the gap is plugged. Drain pan: a clear pan is good; a ring of slime at the water line means the drain line is slowing down.How often should you shoot?
The video below, "Dirty Coil Can Change Everything" from the channel A/C and Life Made Simple, shows why your photo log matters. An HVAC tech cleans a filthy 1993 condenser coil and measures the difference: cooling coil temperature drops from around 67°F to 52°F, superheat falls from 16° to 7.1° — with no refrigerant added. The only change was washing the dirt off. That's the performance your photos are tracking, made visible in numbers.
The tech walks through a real dirty-coil diagnosis: gauges hooked up, readings that look almost reasonable, then the decision to clean the condenser coil before touching the refrigerant. After washing and letting the system stabilize, the numbers tell the story — colder coil, proper superheat, no refrigerant needed. His takeaway is one worth remembering: get the system back to like-new condition (clean filter, clean coil, proper airflow) before making any other adjustments. Your dated photos are how you catch the slide early, before it costs you a service call.
Every 90 days. That matches the typical filter change rhythm and catches a full pollen cycle — oak in February, grass in May, ragweed in September. After a named storm or a week of Saharan dust (you'll see the orange film on your car), add an extra set. Put a recurring reminder in your phone calendar. The first year builds your baseline. Year two is where the trend line pays off.
How do you organize the photos for easy comparison?
Create a folder named "Coil Photos" in your cloud storage or phone gallery. Inside, two subfolders: "Evaporator" and "Condenser." Name each file with date and view: "2025-01-15_Evap_Full.jpg", "2025-01-15_Evap_Left.jpg", "2025-01-15_Cond_Full.jpg". Most phones let you select two images and view them side by side — use that feature. If you want a simple timeline, drop the full-coil shots into a shared album and scroll. The human brain spots color drift faster than any spreadsheet.What does a dirty coil actually cost you?
Here's the math on a typical 3-ton system in a 2,000-square-foot Miami-Dade home. The compressor and blower draw roughly 3.5 kilowatts while running. On a hot summer day the system runs about 10 hours — that's 35 kilowatt-hours a day, or around 1,050 for the month just for cooling. A coil matted with dust and biofilm forces the system to run longer to move the same heat; techs commonly see a 15 to 20 percent efficiency penalty on badly fouled coils. Fifteen percent of 1,050 is about 158 extra kilowatt-hours a month. At typical Florida residential rates (around 14 cents per kilowatt-hour), that's roughly $22 a month — over $250 across a cooling season — spent pushing air through a dirty coil. Those are working estimates, not a lab measurement of your unit, but they show why the photo comparison matters: the bill climbs long before the system quits.
When to call us
Photographing coils is homeowner territory. Deep-cleaning them usually isn't. If your photos show a yellow-green biofilm sheen, white corrosion powder near the coast, or a drain pan with a slime ring, that's when a pro with the right chemicals and a wet vac earns the call. Same if you spot ice on the coil, a burning smell from the air handler, or water pooling under the unit — shut the system off and call. Reach South Florida AC Sanitation at (786) 949-9255 — we serve Miami-Dade County, Monday through Saturday, 8 AM to 8 PM. If the coil just looks dusty and the system runs fine, keep taking your photos and save your money. We'll tell you straight which one it is.
← Back to Blog